Students with autism spectrum disorders and other disabilities are increasingly included in the typical general education classroom. However, there are certain challenges to adapting to the general education setting. Often times these challenges are not academic, but rather include struggling to keep homework organized, completing their agenda (e.g. assignment notebook) at the end of the day, or appropriately transitioning within the hallways of their school. These types of organizational and school-based skills are essential for the success of any student.
A surprisingly simple concept for teaching these types of skills include showing the student a model they can try and copy. Even more interesting, what if the model students watched was themselves? This is exactly the idea behind video self-modeling. Video modeling is a mode for teaching behaviors or skills that includes using a video recording as a model. Video self-modeling is when the student views a video recording of themselves performing the behavior or skill successfully. In the age of tablet technology, recording a video and editing it as needed is simpler than ever.
Supporting Students with Autism Spectrum Disorders
with Video Self-Modeling
The research literature suggests that video modeling and video self-modeling are effective interventions for working with children and adolescents with autism spectrum disorders (see Bellini & Akullian, 2007 for meta-analysis). In addition, video modeling has been endorsed as an evidence-based practice by the National Professional Center on Autism Spectrum Disorders.
Not only is video self-modeling evidence-based, but it is an easy intervention to implement that requires limited materials and time. A teacher, parent, or instructional assistant can easily use this strategy to teach a student a variety of different types of skills such as academic, social, functional, and vocational skills.
Steps for the Implementation of a Video Self-Modeling Intervention
(Adapted from the National Professional Development Center on Autism Spectrum Disorders)
1. Choose a behavior to target. When choosing a skill to teach, be sure to have a clear definition of the skill and all of its parts – this list of steps is called a task analysis. If it turns out the skill has more than 6 or 7 steps, it may not be a good choice for this particular strategy.
2. Gather the correct equipment. An ipad, iphone, or hand held device that records video can be used to record the video. Be sure that the students and adults are familiar with the technology used.
3. Collect Baseline data. Before starting the intervention, observe and collect data on the behavior you have chosen to target. If it turns out that the student already performs the task perfectly, you may wish to pick a different task. It is best practice to collect at least three baseline data points.
4. Plan the video recording. Write a “script” using the tasks analysis of the behavior. Determine a location with limited distractions for the recording of the video. It would be best to find a time that the video can be recorded in the location where the task is expected to occur on a daily basis.
5. Record the video. Prompt the child as needed to record a video of the successful completion of each step in the target behavior. Edit the video as needed to provide a seamless model of the target behavior. Editing software, such as iMovie, is simple to use and free with the iphone and ipad.
6. Determine the environment and time of day for watching the video. Think about when the child will watch the video, how many times, and where they will watch it. Determine if a reward will be necessary. Be sure the equipment needed to watch the video will be available.
7. Show the video. Show the child the video on a regular basis providing prompting as needed to keep attention.
8. Collect Data to Monitor Progress. Continue collecting data on the behavior using your task analysis to determine if the child is improving. If progress is not being made, think about ways the implementation may need to be adjusted to help the child learn.
9. Fade the Video as Needed. Once the child has exhibited repeated successes completing the target behavior, it may be time to fade the use of the video. Moving from every day to once or twice a week might me a good place to start. If you continue to see success, eventual fading of the video all together promotes independence.
An Example of Implementing Video Self-Modeling in a General Education Classroom
We were interested in gathering evidence on the effectiveness of video self-modeling with four sixth-grade students that were receiving special education services in the general education setting. The students were struggling with tasks like homework completion and organization of school materials. These students were educationally identified with Autism Spectrum Disorder, Attention Deficit/Hyperactivity Disorder, Specific Learning Disability, or Traumatic Brain Injury. We identified three specific skills to target and developed a task analysis for what was required for each task.
Filling out the Agenda
1. Student will open agenda to a page that does not contain another day’s assignments.
2. Student will write correct date at the top of the agenda page.
3. Student will write down their homework. This information will be copied word-for-word from homework section of the whiteboard located at the front of the classroom. The student will write with either pen, or pencil, the homework for each subject with 100% accuracy. The student will write in cursive or script to make the writing legible.
4. Student will place an “X” in the subject box if there is no homework in that subject.
5. Student will raise hand by fully extending their arm when they have completed writing in their agenda to have a teacher check the work and to have the teacher sign off. If the teacher cannot read the student’s writing, the student will rewrite the assignment legibly.
*Measurement: Percentage of directions followed to completion correctly
Homework Completion
1. Student removes homework from designated homework folder.
2. Student puts name on assignments on the line provided.
3. Student writes answers to questions legibly.
4. Student writes in complete sentences or circles correct answers when applicable.
5. When assignment is complete student puts their homework assignments back into their homework folder.
*Measurement: Percentage of directions followed to completion correctly
Transitioning from Locker to Classroom
1. The student returns from their locker carrying the required materials for their next class and their binders which contain: a pencil, dry erase marker, agenda, and homework folder containing last night’s homework.
2. The student walks to the end of the line with their classmates.
3. The student walks single file down the academic hallway without disrupting others.
4. The student places their bag on the floor next to their desk.
5. The student places their binder on their desk.
*Measurement: Total time required to complete task
Students were then given explicit instruction on each step, and practiced with their teacher. Their teacher, using a classroom iPad, then recorded a video of each student performing each step successfully. Videos were edited in iMovie, the video editing software that was already installed on the iPad.
Next we needed to find a time of day for the intervention to take place. All of the targeted skills took place at the end of the day, but it was determined the best time to show the students the videos would be during the middle of the day between lunch and recess so they would not need to be pulled from a class. It was important that watching the video was not seen as a chore or punishment.
When the intervention began, students were shown the video in the afternoon and data was collected on the steps of each task. We were also able to collect data on each task before beginning the implementation of the intervention. This baseline data collection period allowed for us to determine whether there was improvement in each student’s ability to perform the steps.
Evidence of Effectiveness in Improving Behavior
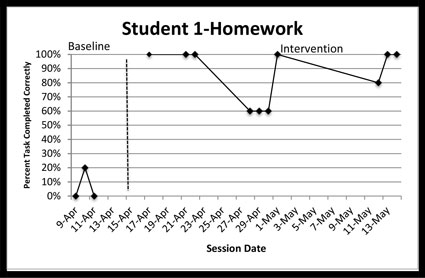
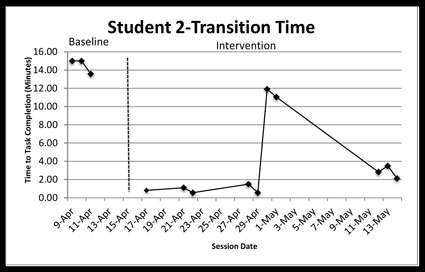
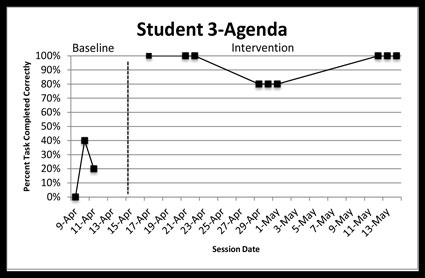
The graphs below show examples of individual student’s improvement on each task from baseline (before we started showing the videos) to the intervention phase (when they began watching the videos once a day).

Student 1 was struggling to correctly complete the steps for homework completion accurately before watching the video model. After this intervention, completion improved to be consistently above 60%.

Student 2 was taking close to 15 minutes to transition from the locker to the classroom before implementing video self-modeling. After implementing video self-modeling, the amount of time to transition dropped to less than 5 minutes on most days.

Student 3 was following the steps to complete their agenda with about 40% accuracy before beginning the intervention. The implementation of a video model increased accuracy to above 80%.
These graphs provide evidence that students were able to fill out their agendas and complete their homework with more accuracy, as well as transition from their locker to their classroom more quickly, when they saw a video model of themselves performing the steps of each task. Anecdotal evidence from talking with the students also suggested that the students liked creating and watching the videos. Therefore, the implementation of this evidence-based practice was successful in improving the target behaviors of students in a general education setting.
Resources
Video Self-Modeling Tutorial: How To and Examples
References
Bellini, S., & Akullian, J. (2007). A meta-analysis of video modeling and video self-modeling interventions for children and adolescents with autism spectrum disorders. Exceptional Children, 73(3), 264-287.
Merrill, A., & Risch, J. (2014). Implementation and Effectiveness of Using Video Self-Modeling with Students with ASD.The Reporter,19(6).

